Do These 5 Things Before Listing Your Home for Sale
Listing your home for sale requires preparation. Sellers, be sure to take these steps to get ready to sell your home.
If you’ve decided on listing your home for sale, this is a great time to begin your home selling strategy.
A successful selling experience does not start when the home is placed on the market. It starts long before the marketing phase even begins. Once a seller is planning on listing their home for sale, it’s time to start preparing for the process.
Selling your home requires planning and preparation. If you take the proper steps before officially listing your home for sale on the market, you can help your home become a market-leading listing opportunity.
Beyond that, being a prepared seller will foster a more efficient transaction. Selling a home is a multi-step process. Homeowners who are prepared for the key points of the transaction that make an impact on the overall deal, such as the property inspections and appraisal, can take measures to create a better outcome.
This forward-thinking approach can help your home sell in less time, for greater profits, and without all the stress.
5 Things to Do Before Listing Your Home For Sale
Start thinking about these presale responsibilities that can get your home ready for your local housing market:
#1. Find Your Perfect Real Estate Agent
According to the National Association of REALTORS® 2020 Profile of Home Buyers and Sellers —
- 89% of home sellers worked with a real estate professional.
- 69% of sellers were very satisfied with the selling process.
- 89% of sellers said that they would definitely or probably recommend their agent for future services.
The first step in a home sale is finding your perfect real estate agent. As industry experts and guides with immense experience in real estate, agents are a seller’s primary guide. A top real estate agent will outline everything that you need to do before listing your home for sale.

Getting connected with your best agent should be the first action step taken on a home sale.
#2. Perform Due Diligence on your Local Market
Sellers always want to approach the housing market being well-informed and ready for the deal. Before you begin creating a listing for your home, invest time in researching your local real estate market.
The way a seller lists their home for sale needs to be reflective of the surrounding housing market. Your individual sale is highly dependent on the conditions of your area’s real estate market.
From the average listing price for comparable homes to the amount of buyer demand your neighborhood is experiencing, sellers need to know what’s going on in the market.
This way, homeowners can make well-advised decisions when they are establishing their selling strategy.
#3. Prepare for the Costs of Selling Your Home

Selling a home is not free. There are fees, taxes, and services that all need to be budgeted for before a homeowner lists their home for sale.
The first step to preparing for the costs associated with selling your home is making a list of what you’ll be responsible for —
- Professional staging services
- Repairs
- Pre-listing site inspections
- Closing costs
- Agent fees
- Moving expenses
- Storage, if applicable
Some of these are upfront costs, while others do not get billed until the end of the deal. Sellers need to be clear about the financial responsibilities of selling to avoid setbacks or sudden surprises.
#4. Make Presale Repairs
Sellers who want to make renovations on the homes before listing them on the market should know that not all projects add the same value.
The renovations that are the most effective in increasing your home’s value and attracting buyer demand will vary based on your location. If home shoppers in your area are particularly interested in a certain upgrade, it could directly affect your sale. Talk to your real estate agent and reference market reports to get specific information on which renovations are best suited for your deal.
From a more general perspective, sellers can look at ROI-based studies on home renovations and their investment versus resale value. The 2020 Cost vs. Value Report by Remodeling Magazine is a helpful resource.
#5. Think About Staging Your Home

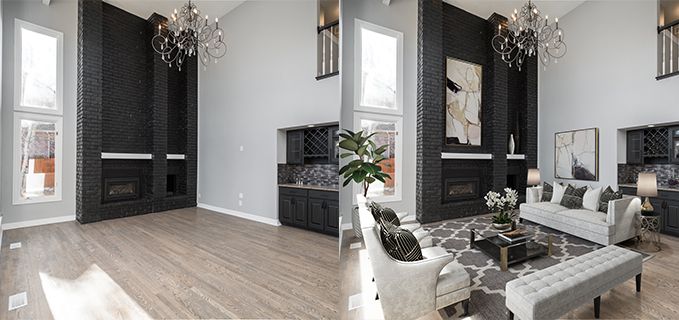
While home staging is not a requirement, it can offer sellers a strong strategy for appealing to buyers. According to the 2021 Profile of Home Staging, 82% of agents representing buyers said that staging a home made it easier for a buyer to visualize the property as a future home. Investing in home staging for the listing process can help your listing resonate with potential buyers.
There are many things that sellers can do to prepare their homes for the market, such as the five items reviewed above. As mentioned, starting with the right agent will help the subsequent actions run smoothly and lead to an easier closing process.


